At my work we are considering ways to efficiently allow users to install/remove software in their Fedora workstations, but without requiring the root password, and in a controlled way (which basically means allowing them to install/remove only some packages and not others).
So I set up to try the following:
- a Fedora13 workstation which downloads software from the standard repositories, to which regular users have no permission
- to create a private repository in another local server, in which we can have all the software local to our workplace, and from which users can install/remove software without requiring administration privileges
So I start by downloading the 32bits
Fedora 13 Desktop Edition, and installing it in a
VirtualBox Virtual Machine. The Live System comes up OK inside VirtualBox, but for some reason, the "Install to Hard Drive" option does not seem to work... I'm not the first one to have
this problem, and setting the "Base Memory" for the Virtual Machine to 1GB seems to solve the problem, and the installation to hard disk starts OK. Apparently after installation we don't need so much memory, so I change it back to 512MB and Fedora13 boots without any trouble:
So, we do the same for another virtual machine, the one that will act as the private repository. Next, we need to be able to boot both machines at the same time and configure networking so that they will see each other. After reading the
VirtualBox instructions I decide configure each machine to have two adapters, one with NAT, and the other one as an internal network (which they will use to see each other):
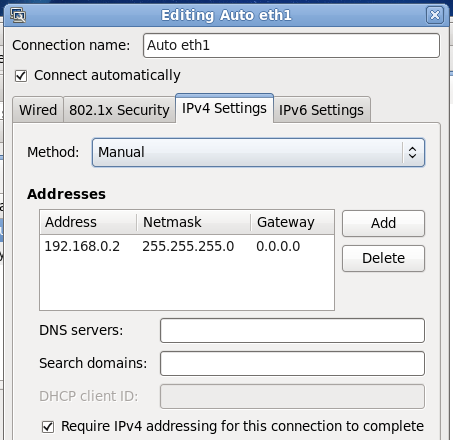
And inside the guests, I configure eth1 manually with the addresses 192.168.0.1 and 192.168.0.2
Then we add two lines to the file /etc/hosts in both guests:
[root@ws ~]# head -n 2 /etc/hosts

192.168.0.2    repo

192.168.0.1    ws
And both machines can see each other without trouble:
Since we haven't changed any configuration regarding the Fedora repositories, right now both machines will get all the software upgrades from the standard repositories, and only root can do them.
So now, we have to be able to create a local repository in the machine
repo and use it as an additional repository in machine
ws, but one from which a regular user can install software.
In order to create a local repository, we follow more or less
these instructions:
yum install httpd

chkconfig --levels 235 httpd on

/etc/init.d/httpd start
But we cannot contact the web server at
http://repo, since the firewall is preventing it. We open it by running the command
system-config-firewall and selecting "http" as trusted. Then, from
ws there is no problem to load the default Apache webpage.
Then we create the local directories:
mkdir /var/www/html/yum/SIE/fedora-13/i386
In that directory we copy the following RPM
xzgv-0.9.1-2.fc13.i686.rpm and then run the
createrepo command:
createrepo /var/www/html/yum/SIE/fedora-13/i386
Then we test in
ws whether it is working. First we create the file SIE.repo:
(Modify to whatever metadata_expire suits you: see
http://forums.fedoraforum.org/showthread.php?t=216398)
And we see that a simple install would work:
But when I really try to install something, then I see that we get problems with permissions. By default Apache simply does not list the .rpm files, and we cannot download them directly (if we rename a .rpm file to a file without extension, then there is no problem...). This has something to do with SELinux! Temporarily running "setenforce 0" solves the problem (see
http://www.crypt.gen.nz/selinux/disable_selinux.html).
Installing something as root is then no problem. In order to be able to run it as a regular user, I create a script:
and add the following in the /etc/sudoers of
ws (see
sudoers documentation):
ALL ALL=(ALL) NOPASSWD: /usr/bin/SIE.install
This is not ideal. The user can install but cannot remove the package. We should find a better way to make sure that a regular user can do all the usual tasks with yum, but only if they affect a package coming from our local repository (search packages, install them, remove them, be informed automatically of any updates...), but for the moment we leave it like this. Later on, we have to have a good read of
PackageKit to see if it provides better control for this (it uses
PolicyKit).
So now we have (an alpha version!) most of the staff in place, and we should just document how to create a RPM package out of our local software, and how to make sure that users get notified of updates to our software. This will have to go in another post...